Google

Thursday, February 24, 2005

Easie and Myeclipse

Note: If you are not able to see the pictures in this post clearly, I would suggest saving these pictures locally and then using any picture viewer tool to enlarge it.

One of the projects I work on uses Easie welbogic plug-in. The development environment is already established and there is nothing much left there to experiment with. To understand it better, I thought about installing this plug-in and get my hands dirty on it.

I checked out the easie web site. They have discontinued with easie and have instead come up with something called myeclipse. It is essentially a J2EE IDE.

To try it out and establish a complete development environment for Weblogic server, I downloaded Myeclipse Enterprise Workbench v3.8.4. It requires you to have JDK and Eclipse 3.0.1 installed.

I installed Eclipse 3.0.1 first. Not much of a problem. Thereafter, I installed myeclipse. During its installation it will ask for the Eclipse installation folder. Rest everything is very easy. Just follow the steps.

Once, you have Myeclipse installed, start the eclipse IDE. You will find a new perspective "MyEclipse" and a new menu option "Myeclipse". If you can see the perspective and the menu option, it means that the installation was sucessful.

The next question was how to install and run Weblogic server. Searched on google. No luck. After wasting some time, I searched on yahoo.com, and got a wonderful link http://www.myeclipseide.com/ContentExpress-display-ceid-40.html

This page explains how to setup various application servers in myeclipse and run them.

Steps to configure and start Weblogic server.

1. Download Weblogic platform from BEA site. Install it.

2. Run COnfiguration wizard. Create a new server and domain.

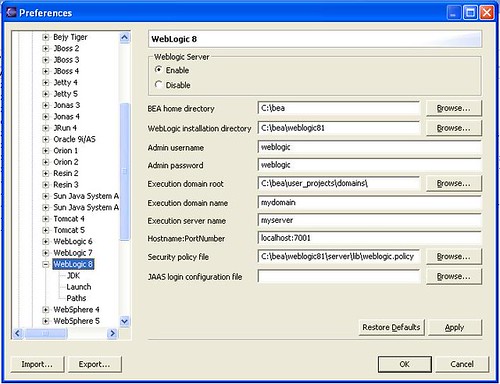
3. Start eclipse. Go to Window->Preferences->Myeclipse->Weblogic8. You will find a number of configurable items here.

4. Except JAAS login configuration file, I specified all other options as you can see in the screen shot below.

WLS configiration

Once you are done with it, Go to JDK option in the Weblogic8. In the WLS JDK name prompt, click on Add. You will get a screen like below.

WLS configiration

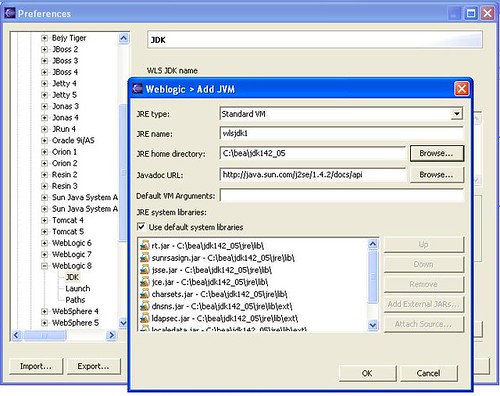
Mention some name. Can be anything. I gave the name WLSJDK. Specify the JRE Home directory(the one that comes with WLS) I gave C:\bea\jdk142_05.

Caution: I tried first to give the path of JRE I had installed at some other location. But for some funny reason, cause of this the WLS server did not run. I wasted another half an hour here. So take care that you mention the JRE location in
your Weblogic installation directory and not some other JRE or JDK installation.


5. Once you are done with all this. Press ok. Now we are ready for starting our Weblogic server.

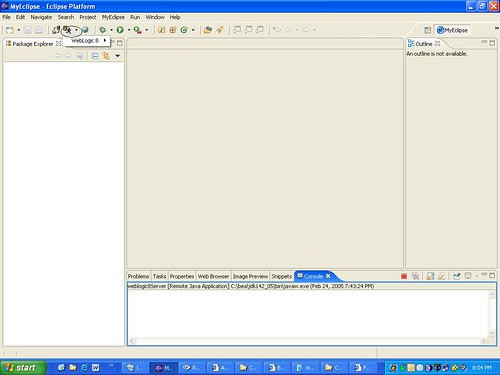
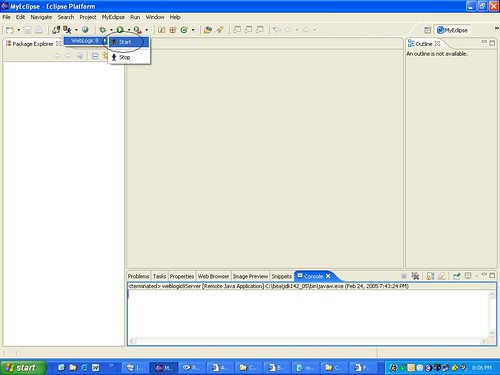
6. Click on the icon as shown in the picture below.

WLS configiration

7. You should now be able to see an option to start weblogic 8. Click on start option.

WLS configiration

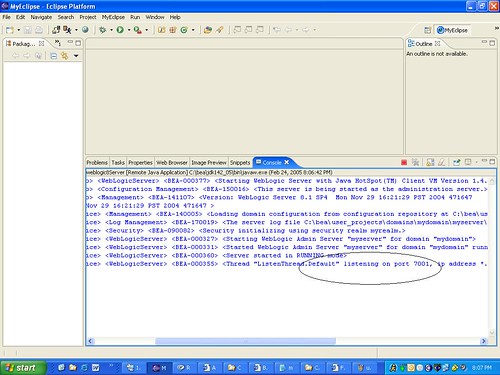
8. If everything goes fine, within next few sec, you should be able to see the message of weblogic server listening at port 7001 in the console.

WLS configiration

Tomorrow, I will write a small application and run in myeclipse.

Happy learning
Deepak

Thursday, February 17, 2005

Introduction on JCoverage

Hi!

Today, I attended a small session on JCoverage. Not much in detail. But enuf to move forward. JCoverage lets you find out how much of your code is covered with your JUnit test test cases.

In the example we worked on, we wrote some code and Junit test cases.
Then we modified our ant build file. We defined another target 'instrument' like below:

<target unless="skip.build.instrument" depends="init" name="instrument">
<taskdef resource="tasks.properties" classpath="jcoverage/jcoverage.jar">
<instrument todir="${instrumented.dir}"">
<fileset dir="${classes.dir}"">
<include name="**/*.class"">
<exclude name="**/*Test.class"">
</fileset">
</instrument">
</target">

In this target, we take all our source class files. JCoverage takes these class files and then creates new class files, which are almost identical to the original class files, with the exception that after every line of code, it puts some line of code, which will help it to find out later whether the line of code was unit tested or not.

After this we modify our 'junit' target like below

-<target unless="skip.build.junit" depends="init" name="junit">
-<junit dir="${basedir}" fork="yes" errorproperty="test.failed"
failureproperty="test.failed">
<classpath location="${junit.other.classpath}">
<classpath location="jcoverage/jcoverage.jar">
-<classpath location="${instrumented.dir}">
<classpath location="${classes.dir}">
<formatter type="xml">
<test name="${testcase}" todir="${result.dir}/reports/junit" if="testcase">
-<batchtest unless="testcase" todir="${result.dir}/reports/junit">
-<fileset dir="${src.dir}">
<include name="**/*Test.java">
</fileset>
</batchtest>
</junit>
<report destdir="${result.dir}/reports/coverage" srcdir="${src.dir}">
<report destdir="${result.dir}/reports/coverage" srcdir="${src.dir}" format="xml">
</target>

As you can see we have modified our class path here. So what happens is that when you execute the test cases, it picks the instrumented class files and not the original class files.

We then defined another task "jcoveragereport' like below

-<target unless="skip.build.jcoveragereport" depends="init" name="jcoveragereport">
<taskdef resource="tasks.properties" classpath="jcoverage/jcoverage.jar">
<report destdir="${result.dir}/reports/coverage" srcdir="${src.dir}">
<report destdir="${result.dir}/reports/coverage" srcdir="${src.dir}" format="xml">
</target>

This will generate some reports. In these reports, it tells us how many lines of code were covered in the test execution. How much percentage of branches were covered in test execution and so on. It also shows the source file in this report, with all the lines which were not covered in the test cases marked in yellow color.

For example: if there is some code in our source file like this

if(...)

......

else
......


Now, if in our test cases, with some input values, we executed the if part of the code block, and didnt check the else part, in the report it will mark the else part in yellow color, indicating that this portion of code was not unit tested.

You can more details on Jcoverage from http://www.jcoverage.com/

Happy learning
Deepak

Saturday, February 12, 2005

Use of this and super key words

Use of this and super key words
-------------------------------------------------------------

Constructors

Constructors are special methods which are used for creating an instance of a class and initializing that instance.

Consider the following example:

/*
* Created on Feb 12, 2005
*
*/
package deepak.learn.twelve_feb_five;

/**
* @author Deepak.Saini
*
*/
public class ConstructorExample {

int instanceVariable;

//Defining the no argument constructor
ConstructorExample(){
instanceVariable = 0;
}

public static void main(String args[]){

ConstructorExample obj = new ConstructorExample();
System.out.println("The value of instanceVariable is : " +
obj.instanceVariable);
}
}

Run the program:
java deepak.learn.twelve_feb_five.ConstructorExample

Output:

The value of instanceVariable is : 0

So when we instantiated the class ConstructorExample in its main method, a call was made to its no arg contructor and its instance variable instanceVariable was assigned a value of 0.

However, we can define more than one constructor.

Check out the following program:

/*
* Created on Feb 12, 2005
*/
package deepak.learn.twelve_feb_five;

/**
* @author Deepak.Saini
*
*/
public class ConstructorExample {
int instanceVariable;

//Defining the no argument constructor
ConstructorExample(){
instanceVariable = 0;
}

ConstructorExample(int instanceVariable){
this.instanceVariable = instanceVariable;
}

public static void main(String args[]){
ConstructorExample obj = new ConstructorExample(10);
System.out.println("The value of instanceVariable is : " + obj.instanceVariable);
}

}

Run the program:
java deepak.learn.twelve_feb_five.ConstructorExample

Output:

The value of instanceVariable is : 10

This time when we ran the program ConstructorExample, in place of no argument constructor, a call to the constrcutor with argument "instanceVariable" was called.

So a value of 10 was assigned to instanceVariable.

One thing to notice here is key word this.

We used the keyword this in the one argument constructor, because the name of the class variable and the argument to the constructor was same.

So in the line this.instanceVariable = instanceVariable

this.instanceVariable is the class variable and instanceVariable is the parameter to the constructor.

How to call one constructor from another?

We cannot explicitly invoke any constructor.
that is you cannot write obj.ConstructorExample();

This is illegal.

Check out the following program:

/*
* Created on Feb 12, 2005
*/
package deepak.learn.twelve_feb_five;

/**
* @author Deepak.Saini
*
*/
public class ConstructorExample {
int instanceVariable;

//Defining the no argument constructor
ConstructorExample(){
this(0);
}

ConstructorExample(int instanceVariable){
this.instanceVariable = instanceVariable;
}

public static void main(String args[]){
ConstructorExample obj = new ConstructorExample();
System.out.println("The value of instanceVariable is : " +
obj.instanceVariable);
}

}

Notice the statement this(0);

What we intend to do here is to call the one argument constructor from the no argument constructor. This we normally do when we have lot of duplicate code in the constructors so instead of duplicating the code. Just invoke the contructors from other constructors.

In our example, in the main method we are instatiating the class ConstructorExample with the statement ConstructorExample obj = new ConstructorExample();

So we have made a call to the no argument constructor.
Inside the no argument constructor, the statement this(0); makes a call to the one argument constructor.

Calls to super class constructor
---------------------------------------

Write a class SubClassConstructorExample which extends ConstructorExample.

package deepak.learn.twelve_feb_five;

/**
* @author Deepak.Saini
*/
public class SubClassConstructorExample extends ConstructorExample {

public SubClassConstructorExample() {

}
public SubClassConstructorExample(int instanceVariable) {

}

public static void main(String args[]){
SubClassConstructorExample obj = new SubClassConstructorExample(40);
System.out.println("The value of instanceVariable is : " +
obj.instanceVariable);
}

}

In this class we created an instance of SubClassConstructorExample with the following statement:

SubClassConstructorExample obj = new SubClassConstructorExample(40);

We passed 40 as a parameter to the one agrument constructor of SubClassConstructorExample class.

Now run the program. The output is as below
The value of instanceVariable is : 0

What???? We passed 40 and what was displayed is 0....Hey what happened here? Any ideas? No....

Ok. What happened here is that we made a call to one argument constructor of class
SubClassConstructorExample and internally, behind the scenes, a call was made to the no argument constructor of ConstructorExample class and as we saw earlier, in the no argument constructor of the class ConstructorExample, we initialized instanceVariable to 0.

Now the question is how to set the value of instanceVariable to 40?

We can solve this problem by modifying the one argument constructor of SubClassConstructorExample class as below

public SubClassConstructorExample(int instanceVariable) {
super(40);
}

With statement
super(40);

we have made a call to the one argument constructor of the super class. So if you make a call to the super class constructor using super, no call is made to the no argument constructor.

One thing to remember here is that the call to the super class constructor should be the first statement inside the sub class constructor.

Another important thing to remember here is that you cannot have both this() and super() statements inside your constructor. Because both the statements should be the first statement of the constructor so there is no way to write both the statements.

Thats is from my side on this topic. If you have any questions you can post a comment. I will definitley reply back

Recommended excercise:

Just play around with the constructors. Define different types of constructors and check the sequence in which they are called.

Happy learning
Deepak Saini

Friday, February 11, 2005

Java Logging API Basics

Java Logging API Basics
-----------------------------------------


Java Logging API is part of Java 2 platform. It provides java.util.logging package which provides you with a logging facility with the following features-

1. Embed messages inside your code
2. configure at runtime whether messages should be displayed or not.
3. If you decide to display the messages, you can configure what severity of messages should be displayed(by default it will display all the kind of messages)

We will use the class java.util.logging.Logger to log the messages in our code.

Steps to be followed in the code:-

1. Create an instance of Logger class and pass as a parameter a package.

Example,

Logger logger = Logger.getLogger("deepak.learn.elevel_feb_five");

The reason we pass a package as parameter is that we can enable or disable logging for a particular package.

2. Log the message using the log method of Logger class.

Example,

logger.log(Level.SEVERE, "Severe problem!!!!!");

Following the sample class I have written to explain the flow.

package deepak.learn.eleven_feb_five;

/**
* @author Deepak.Saini *
*/

import java.util.logging.*;

public class LogExample {

private static Logger logger = Logger.getLogger("deepak.learn.elevel_feb_five");

public static void main(String args[]){
logger.log(Level.SEVERE, "Severe problem!!!!!");
logger.log(Level.WARNING, "Warning!!!!!");
}
}


Run the program: java deepak.learn.eleven_feb_five.LogExample

Output:
Feb 11, 2005 9:46:22 PM deepak.learn.eleven_feb_five.LogExample main
SEVERE: Severe problem!!!!!
Feb 11, 2005 9:46:22 PM deepak.learn.eleven_feb_five.LogExample main
WARNING: Warning!!!!!


Great!!! Now that we have the program running, let us dig deeper.

As you see in the statements below that we have mentioned Level.WARNING and Level.SEVERE.

logger.log(Level.SEVERE, "Severe problem!!!!!");
logger.log(Level.WARNING, "Warning!!!!!");

What does that mean? Ofcourse it gives you a hint of the severity of the error that has been reported.

The java.util.logging.Level class defines a set of standard logging levels that can be used to control logging output.

The levels in descending order are:

SEVERE (highest value)
WARNING
INFO
CONFIG
FINE
FINER
FINEST (lowest value)

In addition there is a level OFF that can be used to turn off logging, and a level ALL that can be used to enable logging of all messages.

Ok. So we have learnt a little more about API now. Lets make some more changes in our class deepak.learn.eleven_feb_five.LogExample

import java.util.logging.*;

public class LogExample {

private static Logger logger = Logger.getLogger("deepak.learn.elevel_feb_five");

public static void main(String args[]){
logger.setLevel(Level.SEVERE);
logger.log(Level.SEVERE, "Severe problem!!!!!");
logger.log(Level.WARNING, "Warning!!!!!");
}
}

Run the program: java deepak.learn.eleven_feb_five.LogExample

Output:
Feb 11, 2005 10:01:18 PM deepak.learn.eleven_feb_five.LogExample main
SEVERE: Severe problem!!!!!!

What did we do?

We set the log level specifying which message levels will be logged by the logger. In our program, we set the level at SEVERE, so when we run the program, we will only see the messages with level SEVERE.

Ofcourse, you can now do a lot of things with the little information we gained today.

Recommened programming excercise.

Rewrite the above class so that you set the logging level as well as the package for which logging must be done at run time.

Happy learning
Deepak Saini